New to release 3.0 of Solace is the emulation of a Northstar disk subsystem. The disk controller is emulated at a low level, meaning that just about anything that works on a real Northstar disk controller should work. The emulation is based on the schematics for the Northstar document "Micro-Disk System MDS-A-D Double Density" (1978) and on the schematics for the compatible controller from Micro Complex.
This particular controller supports hard-sectored disks, with 10 sectors per track, 512 bytes per sector (double density) and 256 bytes per sector (single density). Each disk has 35 tracks, is double sided, and can hold about 350 KB of data.
The Northstar disk controller is actually dual density: either single or double on a sector-by-sector basis. While the Solace emulation for this feature is supported, the single density mode of operation is largely untested due to a lack of any software that exercises that mode.
Below is a screenshot showing Solace booting up CP/M and the user typing a couple commands:
To find out the details of exactly how to boot CP/M, please visit the CP/M help page.
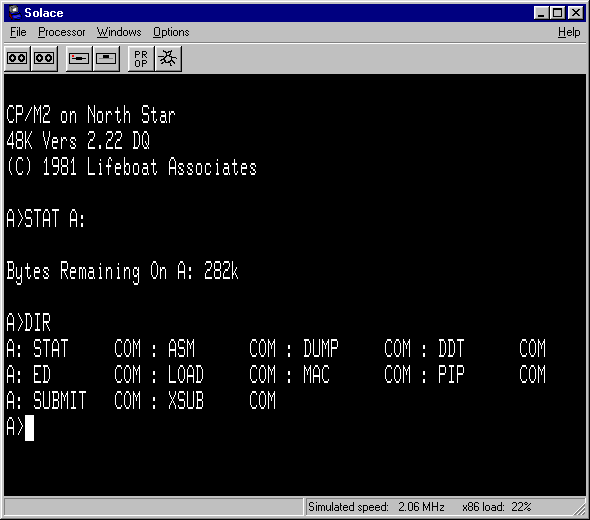
Underneath the menu bar is the Solace toolbar. The toolbar contains a number of icons that provide convenient shortcuts for performing common activities and for displaying certain status.
In the isolated part of the toolbar shown above, there are six toolbar icons. The first two icons are used to open and close control panels for the two virtual cassette tape drives. The right two are used for opening up windows to change Solace properties and for opening the 8080 debugger.
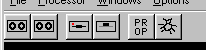
The middle two buttons, as shown here, represent two disk drives. Looking carefully, you'll note that left one of the two has a little red LED indicator, just like a real disk drive, indicating that the disk is selected and the motor is running. The right of the two is not only not selected, there isn't even a disk in the drive. You can tell which disk drives contain a disk by noting that drives containing disks have the little door closed (the square black box in the middle of the icon crosses the horizontal black line), while empty disk drives have the door open (the square black box in the middle of the icon is above the horizontal gray line).
Although this screen capture shows two disk drives, Solace can be configured to support zero to four disk drives.
The toolbar icons for the disk drives don't just supply status; they can also be used to insert a disk into a drive, eject a disk from a drive, or to find out information about the disk in a drive.
By clicking the mouse on an empty drive, a dialog box will appear to allow you to select a virtual disk to insert into the drive. By convention, these disks have the suffix "SVN" for "Solace Virtual Northstar", but any extension can be used. A virtual disk can be in only one drive at a time. If you attempt to load the same virtual disk into more than one drive, Solace will refuse the request.
If a disk is already in a drive, clicking on the drive will eject the disk.
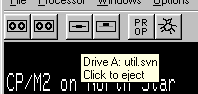
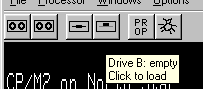
The toolbar also supports "tooltips", which are little help messages that appear when the mouse "hovers" over one of the toolbar icons for a second or so. Different messages are displayed depending if the disk is empty or full. If the drive contains a disk, the filename of the virtual disk is displayed. Below are two captures showing the two cases; unfortunately, the arrow representing where the mouse is located isn't captured:
Finally, right clicking on a drive icon that contains a disk will bring up the "Disk Factory" dialog, in inspect mode. More on that next.
The "Disk Factory" is a fun name for a simple utility that has two uses. In the "create mode," the interface is used to create new virtual disks. A virtual disk is simply a file on your real hard disk that has a special format that is compatible with the Solace emulator. The other mode is the "inspect mode," where an existing disk's attributes can be inspected.
You can move between creating new disks and inspecting old disks via the File menu.
There are two ways to get into the create mode in the disk factory interface. One way is to select the menu item "File/Disk Factory..." item from the Solace main menu. The second way is when the disk factory interface is already visible, select the menu item "File/New" on the disk factory menu bar.
Below is what the disk factory interface looks like in the disk creation mode:
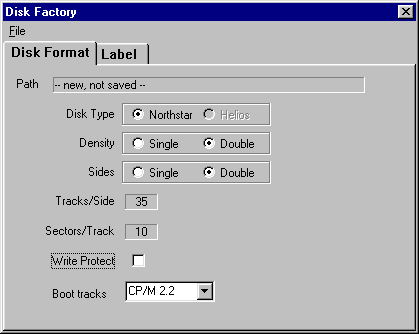
In disk creation mode, there are a few radio buttons that can be used to select what type of virtual disk is to be created. Although the disk factory interface has a button for the Helios format, it is not currently supported and is permanently grayed out.
Note the combobox at the bottom for "Boot Tracks". By default, this is "None". If desired, an operating system image can be installed on the first track or first few tracks (depending on the OS) when a new disk is created. In the picture above, CP/M 2.2 has been selected. However, this can be selected only if the options are set to double sided, double density (each configuration requires a different CP/M BIOS and Solace has an image of just one configuration). This feature is just a convenience and isn't the final word in building a bootable disk image. Only the boot tracks are installed and none of the utilities for tht OS are included. A more general and robust solution is to use the utilities of that OS to configure the system as you really want it.
After selecting the disk options you want, you can select the "Label" tab and edit the disk label (described below). Finally to actually make the virtual disk, the menu "File/Save As..." must be used to give the disk drive a file name. The interface then changes to the "inspect mode."
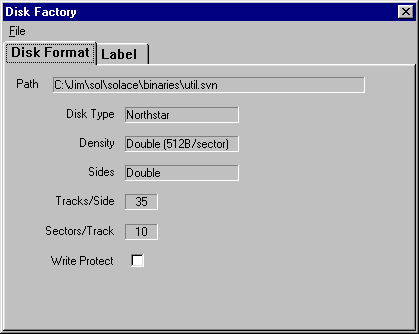
Inspect mode is a lot like the "create" mode, except that rather than allowing the user to choose the disk format, the information is simply displayed and can't be changed, except for two things: the write protect status, and the disk label. After changing either attribute, the change is made permanent by selecting the menu "File/Save..." item.
There are three ways to get to the disk factory inspect mode. The first way was just mentioned: by saving a newly created disk. The second way is via the disk factory menu bar, by selecting "File/Inspect..." The third way is by right clicking on the toolbar icon for a disk drive that contains a disk; in this case the disk being inspected is the one in the virtual disk drive.
Below is the capture of the disk factory interface viewing information about a virtual disk. Of all the fields displayed, the only one that can be edited is the write protect property.
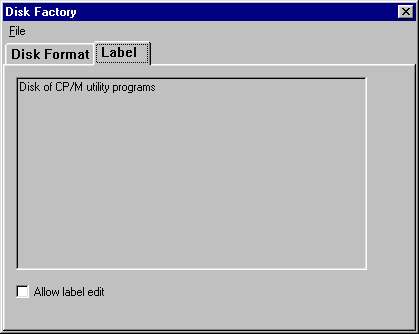
The second attribute that can be changed on an existing disk is the disk label. By selecting on the appropriate tab, the following interface is displayed. By default the label can't be edited. Note that the "Allow label edit" isn't selected.
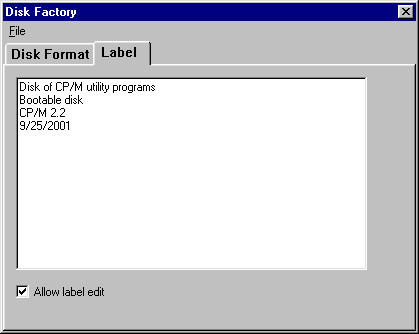
If you wish to edit the label, check the "Allow label edit" box and the grayed out label becomes black on white and the label can be edited. Up to 3 KB of label text can be created.
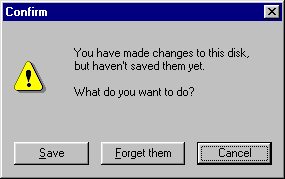
In either create mode or inspect mode, if a property of a new or existing virtual disk is changed and the file isn't saved before a new disk is chosen for creation or inspection, the following dialog pops up, asking for confirmation of what to do. All it is is a reminder that edits were made that haven't yet been saved.
When in inspect mode and with all changes saved, the File/Dump menu option will dump the disk in an ASCII format. There is no good use for it except for diagnosing problems.
Solace has an interface to a set of property pages to control various options of the Solace emulation. It is accessible via the Solace main menu "Options" menu item, or by clicking on the options button on the toolbar. In this section we are concerned only with the page describing options for Northstar (N*) disk emulation. No matter which Category is selected in the Options control panel, move the choice to "N* Disk Ctlr" and the following dialog will appear:
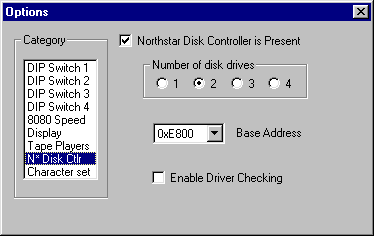
If the "Northstar Disk Controller Present" isn't selected, all the other items on the dialog will be grayed out, and the toolbar on the main Solace window will not show any disk drive icons. By selecting this item, it installs a virtual disk controller into the Solace computer.
The address where the Northstar disk controller resides is chosen by the "Base Address" combo box. The standard location is 0xE800 and it is also the default location. Unless you really know what you are doing, it is advised that this value not be changed. The virtual disk images that are created by the Disk Factory and that are available from the Sol Archives web site all have boot tracks that have code that assumes that the disk controller exists at 0xE800.
There are four radio buttons groups under the heading "Number of disk drives." This selects how many disk drives are hanging off the disk controller. By choosing a different number, more or fewer disk drive icons will appear on the main Solace window's toolbar. A word of caution, though: if the number of disks is revised downward and one of the disks drives that is going away contains a virtual disk, that disk will be ejected; make sure you don't do this at a critical time where data that needs to be written to the disk hasn't been written yet.
The final item on this control panel is the "Enable Driver Checking" checkbox. By default it isn't selected. If you want to write or debug a disk driver, select this checkbox. If it is checked, it will cause Solace to check for various violations of the disk controller's software interface. For example, if the disk head is stepped too quickly, or the head is stepped out too far, or if the disk step direction and the step pulse are given at the same time. In any of these, and other, cases, if the "Enable Driver Checking" is selected, a warning box appears like the one below:
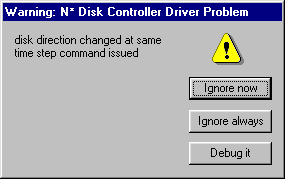
The exact text that is displayed depends on what error was detected. The user then has three choices:
If you need exact details on the file format chosen by Solace for representing the Solace Virtual Northstar disks, please look at the source code for Solace or contact the author of the program. What follows is a very brief and imprecise description of the file format.
The virtual disk image consists of two parts: the first part is a fixed-size header; the second part is a sequence of fixed-size blocks, with each block holding information about one sector. The number of sectors in the virtual disk depends on the disk format information contained in the header block.
The header block contains:
Although the disk controller is dual density (each sector may be recorded in either single or double density), the purpose of the disk density entry in the header is that disks are certified as either single or double density. A double density virtual disk reserves 512+ bytes per sector even though a given sector may contain only 256+ bytes. A single density virtual disk reserves only 256+ bytes per sector, and thus is smaller than the image of a double density disk.
After the initial 4 KB header block is a series of sector images. The image consists of one byte indicating what density that sector was written in, two bytes indicating how many bytes are actually written on that sector, then a variable number of data bytes representing the raw bytes written to the disk. The number of bytes allowed per sector is actually (256+56) in single density mode and (512+112) in double density mode. These bytes are actually on the real Northstar disk and are used for holding a preamble before the data, a sync byte or two, the data bytes, and a trailing checksum. How those numbers came to be is that there are 6250 bytes/track, unformatted, double density.
Although an attempt has been made to be faithful to the real hardware implementation of the Northstar disk controller, the emulation isn't every going to be 100% perfect. This is due to both ignorance and laziness. Known issues:
Back to Solace main page.
Last update: October 23, 2001